Thursday, December 25, 2014

Merry Christmas!

I know things have been quiet around here lately, but it's because we've been so busy between sprucing up the new house and getting ready for New Orleans! There will be so much to share with you in the new year. :)

Today I volunteered in the shop with Michael since he was working. I wore a gown I made last year (and wore on Christmas last year working on the tent project!) but I've never gotten pictures of me wearing it! I have to admit I was very pleased with how my hair turned out. I'm also wearing the gown over my new false bum. It was really nice to be able to work with my husband and friends all together on Christmas!


 10891862_10204274400073759_186753578216230352_n
10885101_10204274398873729_7946459095962551219_n
10891805_10204274398913730_7038664153052510795_n

My Christmas gift from Michael was an 18th century mourning ring with little diamonds set in the eyes of the death's head. I love it. And he totally had me guessing about what I was going to get! He's a pretty good gift-giver...
10882362_10204274389113485_539943071681028619_n
10891713_10204274389073484_1949150681593260217_n

Wednesday, November 19, 2014

Mad About Mourning

There's been so much talk about mourning lately, especially with the Met Museum exhibit up and running. As long-time readers know, mid-19th century mourning clothing is a subject that I am very passionate about, and this Saturday I'll be reprising my lecture on mourning accessories and millinery at the southeastern regional Costume Society of America conference.

I just snagged this CDV on Etsy yesterday, and I wanted to share it with you all because it perfectly shows the types of accessories and millinery that my lecture focuses on. These accessories act as "clues" to let us know whether a woman might be in mourning.

For one thing, the woman wears a black collar and undersleeves. In the 1860s, collars, cuffs, and undersleeves for everyday wear were almost always white. But full mourning called for collars, cuffs, and undersleeves made of black crape. The woman also wears a widow's cap, which is a style of cap quite distinct from caps for everyday wear. It 
has a very full "quilling" of trim around the front, creating the thick white halo around her head. Widow's caps sometimes have very long lappets as well, although they are absent from this example.


This excellent engraving of Queen Victoria shows her wearing a widow's cap, and you can see a bit more clearly the "quilling" trim. She also has a bow at the back of her cap, like the woman in my CDV.
queen_victoria_mourning

Sunday, November 16, 2014

Present at ALL THE CONFERENCES!

Yesterday I presented my research on a curious Dutch headdress called oorijzer. It was incredibly well received and I will be working on getting the paper published (so no big blog post...). But here's a picture Jenny La Fleur snapped of me during my lecture!

(No, really, there was actually an audience, I swear!)

10422015_590915964387565_1652446692742658661_n

Now I'm off to another conference this coming weekend to reprise my mourning millinery lecture. I'm very excited to give this one again, especially with the Met exhibit up. Hopefully there will be good questions and conversation as a result!

Monday, November 10, 2014

Burnley and Trowbridge Polonaise Workshop

I attended my first Burnley and Trowbridge workshop and have come away with an almost completed polonaise jacket! It's made out of a striped sheer white cotton that matches a flounced petticoat I finished last year. The workshop was so fun! Of course, it helps when you're fitting with one of your best friends :)

I'm looking forward to finishing this in time for summer. It will get lots of ruffles! And I need to make a plain white linen petticoat to wear under the sheer one (my current cream mock quilt one makes the skirt look dingy). But for now... *sigh*... It's back to 1815 and New Orleans sewing...

Here's my inspiration, although I'm doing long sleeves: 


Oh... The hem really is even! I was leaning forward and trying to be cute... ;-P

Tuesday, October 28, 2014

...and then we bought a house!

This has been our big secret for the past few months. We never dreamed of buying a house so soon, but we have been very blessed. The house is perfect for us in size and location, and has all the charm that we were looking for, being an older house (1951). There are lots of decorative things we want to do, like paint and crown moulding, and the kitchen and bathrooms can stand to be updated (although the original 1950s tile is in great condition!). But really, it's adorable and we are so happy!

However, the night before we closed on the house, our little black kitten swallowed a straight pin and we were thrown into the panick of getting emergency vet care. All told, we were either driving around or sitting in waiting rooms for 5.5 hours, getting home at 3:30 am only to get back up at 7:30 am to pick him up after the surgery before the emergency vet closed. It was quite an experience... But he is doing very well now!

So... that's why there has been no sewing. I'm also presenting at two conferences this coming month. Life has been CRAZY.


Thursday, October 2, 2014

The "Shell'd" Gown: At Last!

They're not the best pictures, but they are pictures!

This print is so awesome for mimicking 18th c "shell'd" prints. Although it looks surprisingly modern, check out these originals:

http://www.pinterest.com/pin/75153887506338817/

https://www.facebook.com/foundlingtokens/photos/pb.142916505743501.-2207520000.1412136854./157379224297229/?type=3&theater

This type of one color, simple print would have been a nice, cheap fabric for a gown. Nothing fancy here!

Hillary Rizen has been doing some awesome research on 18th century prints. Wm. Booth, Draper is even carrying some of the prints she designed. Burnley and Trowbridge have also been researching and making custom prints heavily inspired from original prints. They are currently out of stock but are expecting more, new prints soon! Stay tuned!

I hope I get another chance to wear this dress and take good, proper pictures of it...

It's lined partly in white linen and partly in checked linen, for added anti-fancy-ness! :)


IMG_1300
IMG_1301

Monday, September 22, 2014

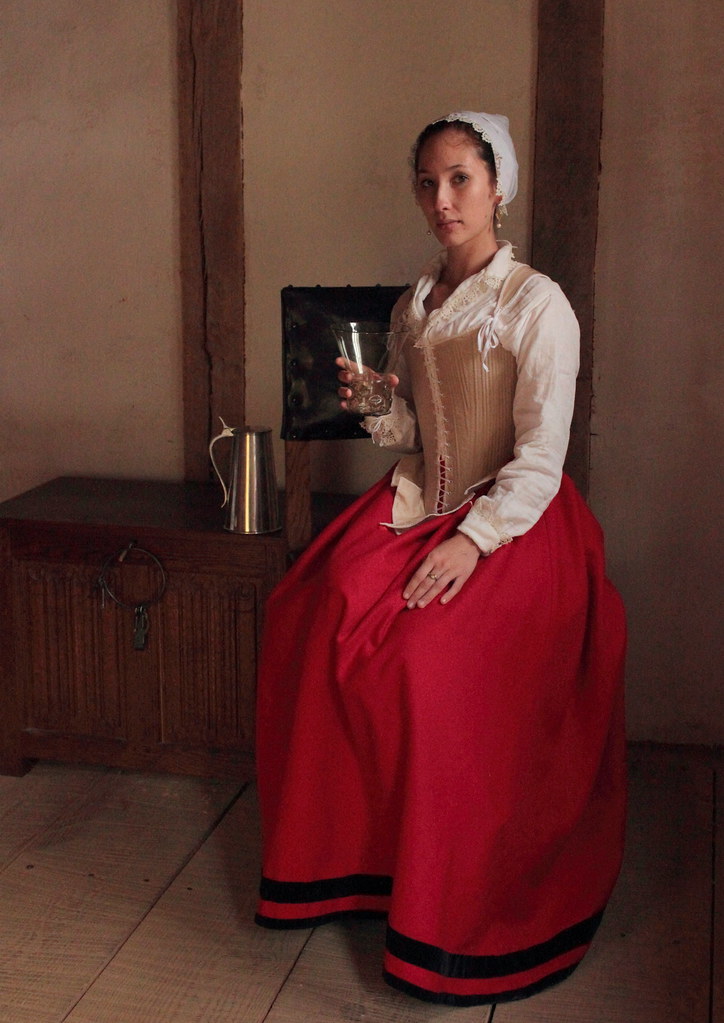
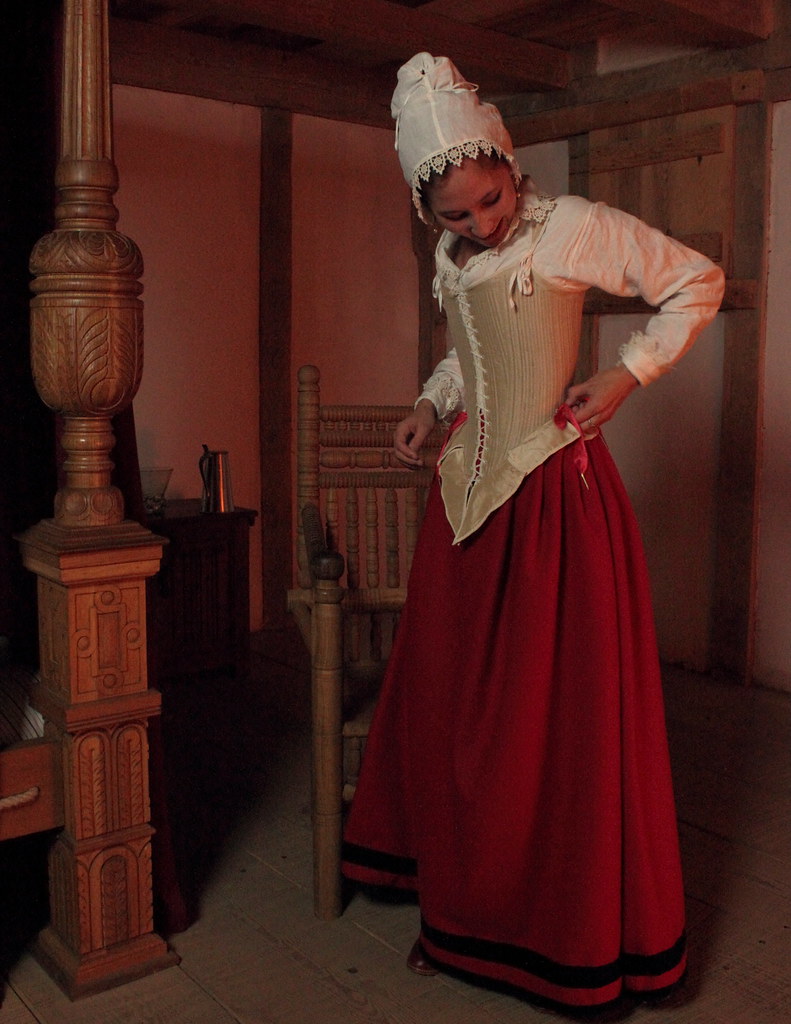
17th Century Undergarments Photo Shoot


Another post already, can you believe it?! Today I got the pictures from the awesome photo shoot I did with Frederick Scholpp, which I posted a teaser of last week. We had a great time, and it was so fun working with someone who has such a great eye for capturing shots and could perfectly understand my inspiration. Both of us being artists in different mediums, I think we worked really well together!

I fully intend to do a separate post on the pair of bodies and smock with construction detail pictures and more historical notes, but for now here are "overview" pictures of how the undergarments looks when worn all together.

First is the linen smock, completely hand sewn and trimmed with reproduction lace from The Tudor Tailor. The pattern is an amalgamation of shapes from Patterns of Fashion 4.

Next is the petticoat, which is red wool broadcloth bound and guarded with black velvet. The waist is bound with red silk taffeta and worked with eyelets so that it can be pointed to the pair of bodies. Based on a few portraits (particularly the Elizabeth Vernon portrait) and a video of Jenni Tiramani showing a reproduction pair of bodies pointed to a matching petticoat, AND this old but very interesting conversation on this question here, I made the decision to do this bodies-pointed-to-petticoat method. It works wonderfully well for helping to support the relatively heavy wool broadcloth. The points were custom made for me by Francis Classe (available through his etsy shop, and I have a pair for my American Duchess Stratfords as well.

The pair of bodies are from The Tudor Tailor, the Elizabeth Vernon style. I can't tell you just how incredibly comfortable these are!! I love them so much... They are silk taffeta, interlined with heavy linen and lined with white linen, boned with reed. More info in the construction post, I promise!

All of the materials (smock linen, all threads, wool broadcloth, silk taffeta, linen interlining and lining, silk paduasoy ribbon binding), except for the lace, reed, and points, are from Burnley and Trowbridge!

I hope you enjoy. :)

IMG_9743.JPGcanon edit
IMG_9749.JPGcpro.jpgFB
IMG_9775
IMG_9783

IMG_9825

IMG_9915.JPGedt2
IMG_9918

IMG_9934.JPGpcsaedit

IMG_9944
IMG_9986

Sunday, September 21, 2014

Domo arigato, made a rebato!

(Michael insisted I use that as the title for this entry...)

So I decided to make a rebato to solve the ruff issues I mentioned previously. The latest Patterns of Fashion was an IMMENSE help, since they have quite a few examples in there. 

Rebatos in the period tend to be completely wrapped in silk and gilt thread or wire... which I definitely wasn't crazy enough to do. So I used black thread-covered 21 gauge millinery wire, although I did then wrap every piece by hand with fine gold wire on top of that (some things I am crazy enough to do...).

My darling, wonderful husband cut and shaped the millinery wire pieces, then I wrapped and assembled them. It was really neat to see these crazy pieces of unruly wire come together into something useable! The "spoke" pieces radiating out from the neck are not just decorative; they are central to keeping everything sturdy.

The inner arches are actually one piece of wire that snakes back and forth inside of the outer wire. I thought that was really neat, although it was a pain in the neck to do in practice... But we persevered! The last really difficult part was the out "frill" as I call it. Each of the wire arches supports a particular point of the lace. It took quite a bit of careful measuring to get everything to line up, and I did get off a tiny bit on one side, but it's hard to see. For the most part, they line up perfectly!

And so, I am one piece closer to inadvertently recreating the 1616 woodcut of Pocahontas! I never set out to recreate it, but here I am... Next up will be the loose gown, but probably not for a while... We'll see!


IMG_1271IMG_1274IMG_1272
IMG_1281 IMG_1283

Tuesday, September 16, 2014

Another Tease...

I always seem to underestimate how long it will take me to actually get images in hand after a photo shoot! I've shared some teaser pics on my Facebook, but I thought I would share one of them here to whet your appetites for the big blog post that's coming up on my 17th century undergarments, once I get all of the pictures from our awesome photoshoot. 


Monday, September 1, 2014

Follow Me on Facebook!

I've created a Facebook page for my blogs where I'll be posting frequent progress pictures and random musings. I noticed I was posting things on Facebook but not here to the blog because they weren't things I deemed "blog-worthy", but my Facebook friends still found them interesting. I think the blogs will be for big, nicely photographed posts of completed garments, and the Facebook page will be for in-progress shots. 

https://www.facebook.com/thecouturecourtesan 

Come find out what I've been up to!


Saturday, August 30, 2014

Riding Habit Construction

Unfortunately, I didn't take construction pictures of the entire process... I got too caught up in everything, and learning completely new ways of doing things! But here are a couple images of some of the early steps, and some pictures of it after it's done to highlight a few interesting things.

I must take a moment to acknowledge the incredible generosity of my husband and his master, Mark Hutter, for helping me with the construction of this. I feel blessed to have them in my life, as mentors and friends!

The very first thing I did was sew the center back seam of the jacket. This was done by putting all four layers together (2 wool and 2 silk lining) so that they could be sewn all at once. Make sure the two wools are right sides together, and the two silks are right sides together. 


DSCN0288

I sewed the seam in non-matching (totally period!) silk thread with a tiny, tidy backstitch. 
DSCN0289

Once it's sewn, you can unfold the layers like so, revealing a fully-encased seam.
DSCN0290

Ta-da! Make sure to press it so it's nice and neat. Pressing is your best friend when it comes to tailoring. That, and chalk.
DSCN0291

Another interesting (and very different from mantua-making!) aspect of tailoring is all of the interfacing! There's no pad stitching anywhere in this garment, just a heavy, coarse linen (I could/should have gone the extra step and put a couple layers of gum tragacanth on the linen to create buckram, but...).

The interfacing is tucked under the seam allowance of the front edges. Press, press, press!
DSCN0292
DSCN0293

Then I basted down the front edge so everything would stay in place. The lining gets folded under to meet the edge, and then is felled down.
DSCN0294

On the outside of the jacket, the outer edge of the interfacing gets tacked into place with a very widely spaced backstitch. Yes, it shows, but it's helpful and period, and if done neatly, it looks quite nice!
DSCN0358

All of the body seams (side-backs, shoulders, armseyes) were sewn twice: once with a back stitch, and then again with a spaced back stitch on top. I pressed the seam allowance to one side, and then did a spaced back stitch along the seam.
DSCN0359

Eighteenth century stitching (in fact, stitching from ALL periods!) is NOT always pretty! Especially when it won't show. :) This is how the lining is attached to the back skirts. It is done from the outside with a spaced back stitch. The underside looks shoddy...
DSCN0360

...but the outside is very neat and tidy! But no one will see it unless they are scrutinizing your bum...
DSCN0361


The side-back seams of the lining are folded on top of the center back lining and felled down, just like on women's gowns. That was at least something I was familiar with!
DSCN0363

Buttonholes... Oh, buttonholes. I love doing them now! I never thought I'd say that. But they are quite satisfying to do, making the little knots. These buttonholes were done using a "proper" buttonhole stitch, not a blanket stitch. I totally did not know they were different things before doing this project... I'd never needed to do buttonholes before! Now I do thousands by hand for work...There's a good tutorial here on Youtube. I can't remember if he says it in the video or not, but WAX YOUR THREAD! You will thank yourself... And use silk buttonhole twist, too. Having the right materials makes a world of difference, and it makes things easier!
10260010_10202761835020578_4143844557181114588_n

I hope this has been useful! I don't usually do construction write-ups like this, but this was such a fun, different experience that I had to share. If y'all like this kind of thing, I'll try to do it more often. :) Cheers!